Edit inside an agentic conversation
Find and select scene layers, size and position images, trim or split scenes, and make other precise adjustments after agentic chat creates your video. If changes do not save, preserve any unsaved wording, reopen the same project once, and stop if the change disappears again.
Written By Rishikesh from ngram
Last updated 9 days ago
Read before this
Choose the matching experience
This guide describes the V1 workflow and its available controls. For V2 (Beta), start from Home, review the plan, and request revisions through chat or Make changes. Do not assume the V1 controls shown here are available in V2.
The scene editor works best as a finishing workspace. Ask agentic chat to create the first version, then open Edit to make small, precise adjustments such as moving a layer, correcting one line, changing a background, or timing an effect. Starting blank is useful when you already know the exact layout you want, but it requires more manual setup.
Use this when
Use this guide when you want to replace a scene image or video with uploaded media, edit layers or timing directly, or troubleshoot an Edit workspace that will not load, has missing controls, or does not keep a saved change. Direct scene edits stay connected to the conversation; Open in editor creates a separate copy.
This does not solve
This guide does not cover broad story rewrites or guarantee recovery of an unsaved edit. Return to chat for changes to meaning, story, or creative direction, and copy any unsaved wording you need to preserve before reopening the page.
Before you start
- Use a desktop browser. Manual scene editing is not available on mobile.
- Open a project you own and wait for generation to finish before editing it.
- Starting from a blank editor is available to subscribers.
- Most canvas, effect, background, template, and music changes remain staged until you select Save.
Open the scene editor
Recommended: begin with an agentic video
- Open the finished conversation from Projects.
- Select Edit above the video preview.
- Select the scene you want from the timeline, then select a layer on the canvas when the change applies to one element.
Optional: start with a blank editor
- From the Studio home screen, select Start in a blank editor.
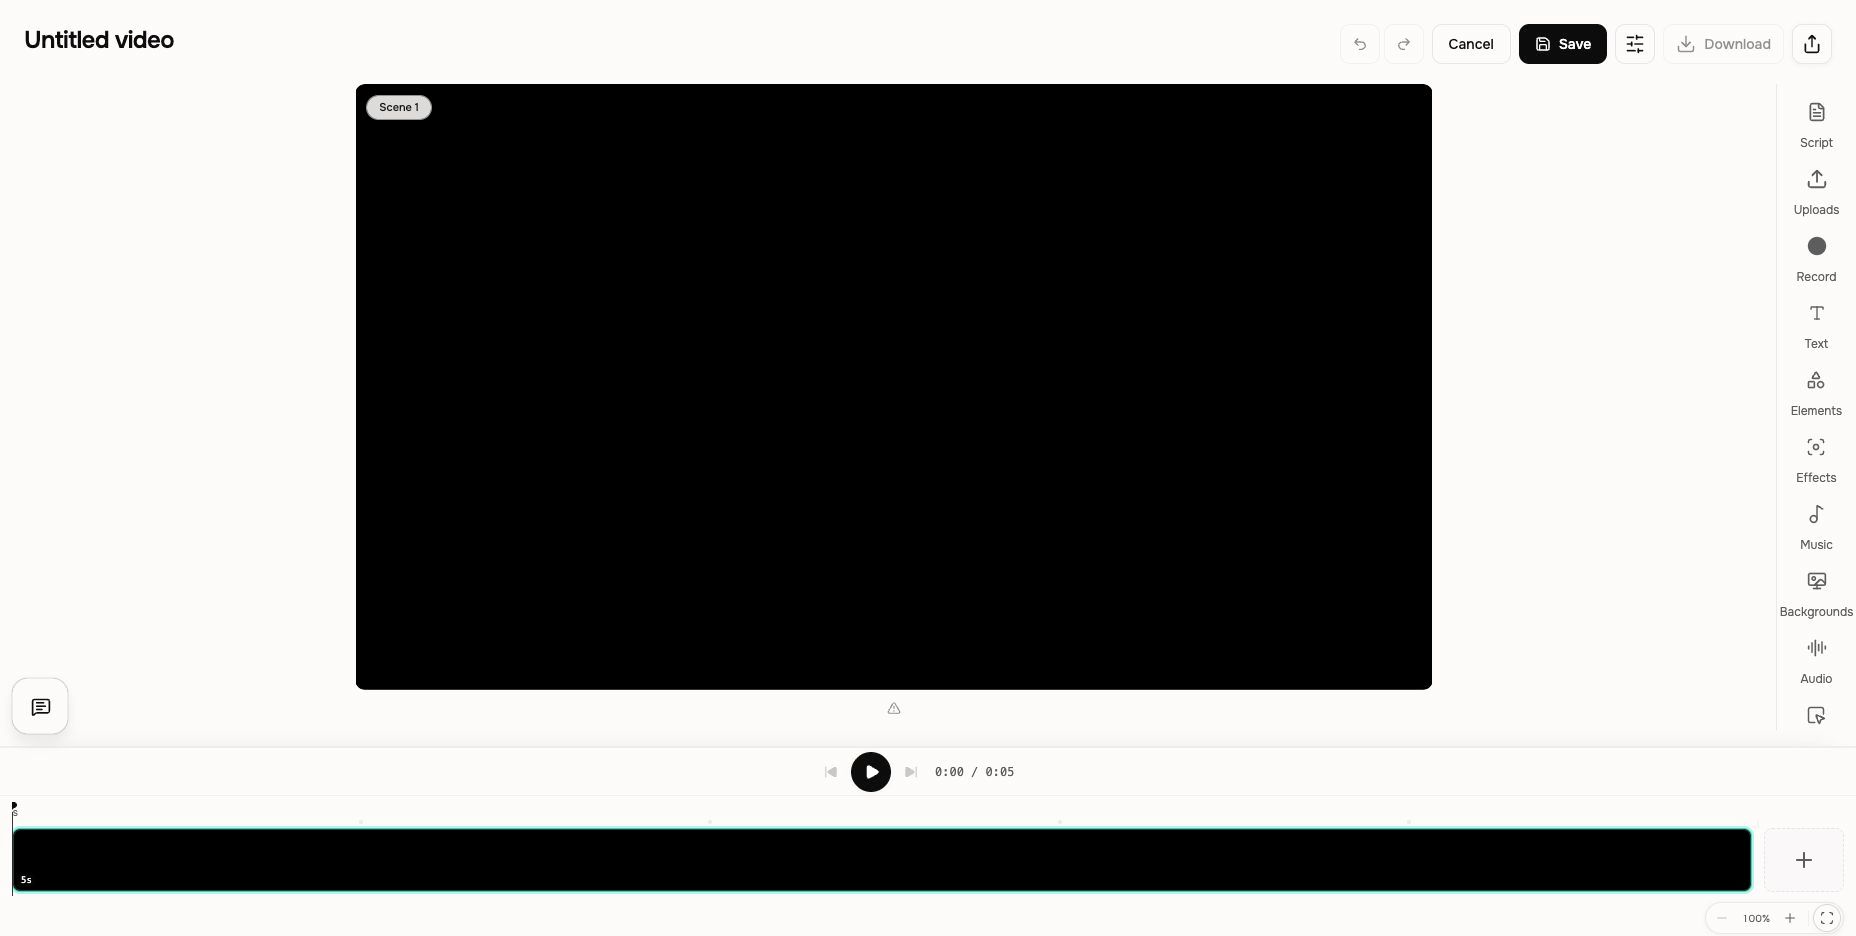
- Studio creates an Untitled video with Scene 1. Add text or media, or open chat when you want the agent to help build the video.
Know the workspace
- Canvas: preview the current scene and select, move, resize, or edit its layers.
- Editing rail: open Layers, Script, Uploads, Record, Text, Elements, Effects, Music, Backgrounds, Audio, Interactivity, Chapter, and Tools. Templates or Layout appears only for compatible scene types.
- Timeline: play the video, select a scene or timed item, add a scene, move the playhead, and zoom the timeline. Effects, music, and other supported audio appear on their own tracks.
- Top controls: Undo or Redo scene edits, Cancel staged changes, Save them, open Edit video quick controls, then Download or Share the saved result.
Add a chapter card before a scene
Use a chapter card when viewers need a short, branded title before a scene begins. It is a one-second opening card attached to that scene, not a separate scene in the timeline.
- Open the finished conversation, select Edit, and select the scene in the timeline.
- Open Chapter in the editing rail, then turn on the option to show a card before this scene.
- Set the title, subtitle, and template; choose whether to show the scene number, then select Save.
- Play from the start of the selected scene to confirm the card appears before the scene content, then export when the result is ready.
If the card is not right, keep the project open, select the same scene, and adjust or turn off its Chapter settings before saving again. The card is stored with the selected scene, so changing another scene does not change it.
Select and adjust canvas elements
- Select a text, shape, image, or video layer on the canvas.
- Drag the layer to move it. Use its handles to resize it.
- Use the floating controls when available to change colors, opacity, shadow, entrance or exit animation, alignment, or to duplicate the layer. Use Arrange to move a compatible layer forward or backward when it needs to sit above or below another layer.
- Double-click editable text, type the replacement, then click away or press Command+Enter to keep it. Press Escape to cancel the text change.
- Use the trash control to remove a selected layer. Undo is the safest recovery if you remove or move the wrong item.
Size and position an image precisely
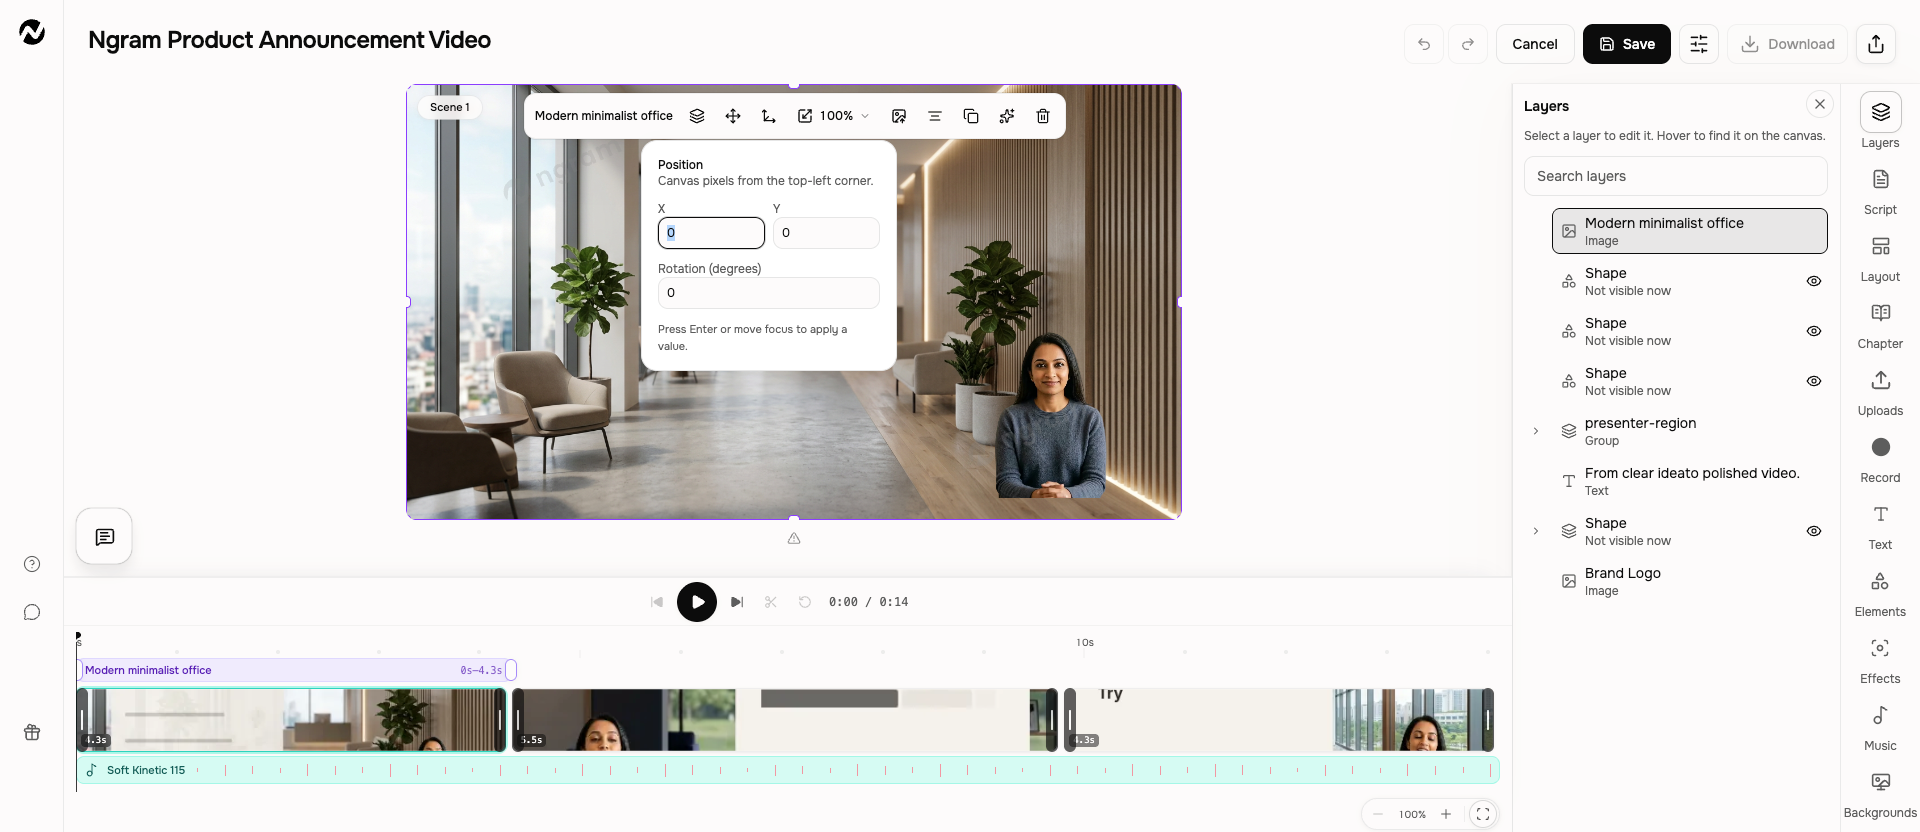
- Select an editable image on the canvas. The floating toolbar appears beside the selected image.
- Open Image properties and choose 10%, 25%, 50%, 75%, or 100% when you want a repeatable width relative to the video frame. Use the resize handles for a custom size.
- Open Position to enter horizontal and vertical canvas coordinates or a rotation in degrees. Press Enter or move focus away from a field to apply the value.
- Replay the scene and confirm the image stays inside the frame before selecting Save. Use Undo if a precise value puts the image in the wrong place.
Trim or split a scene
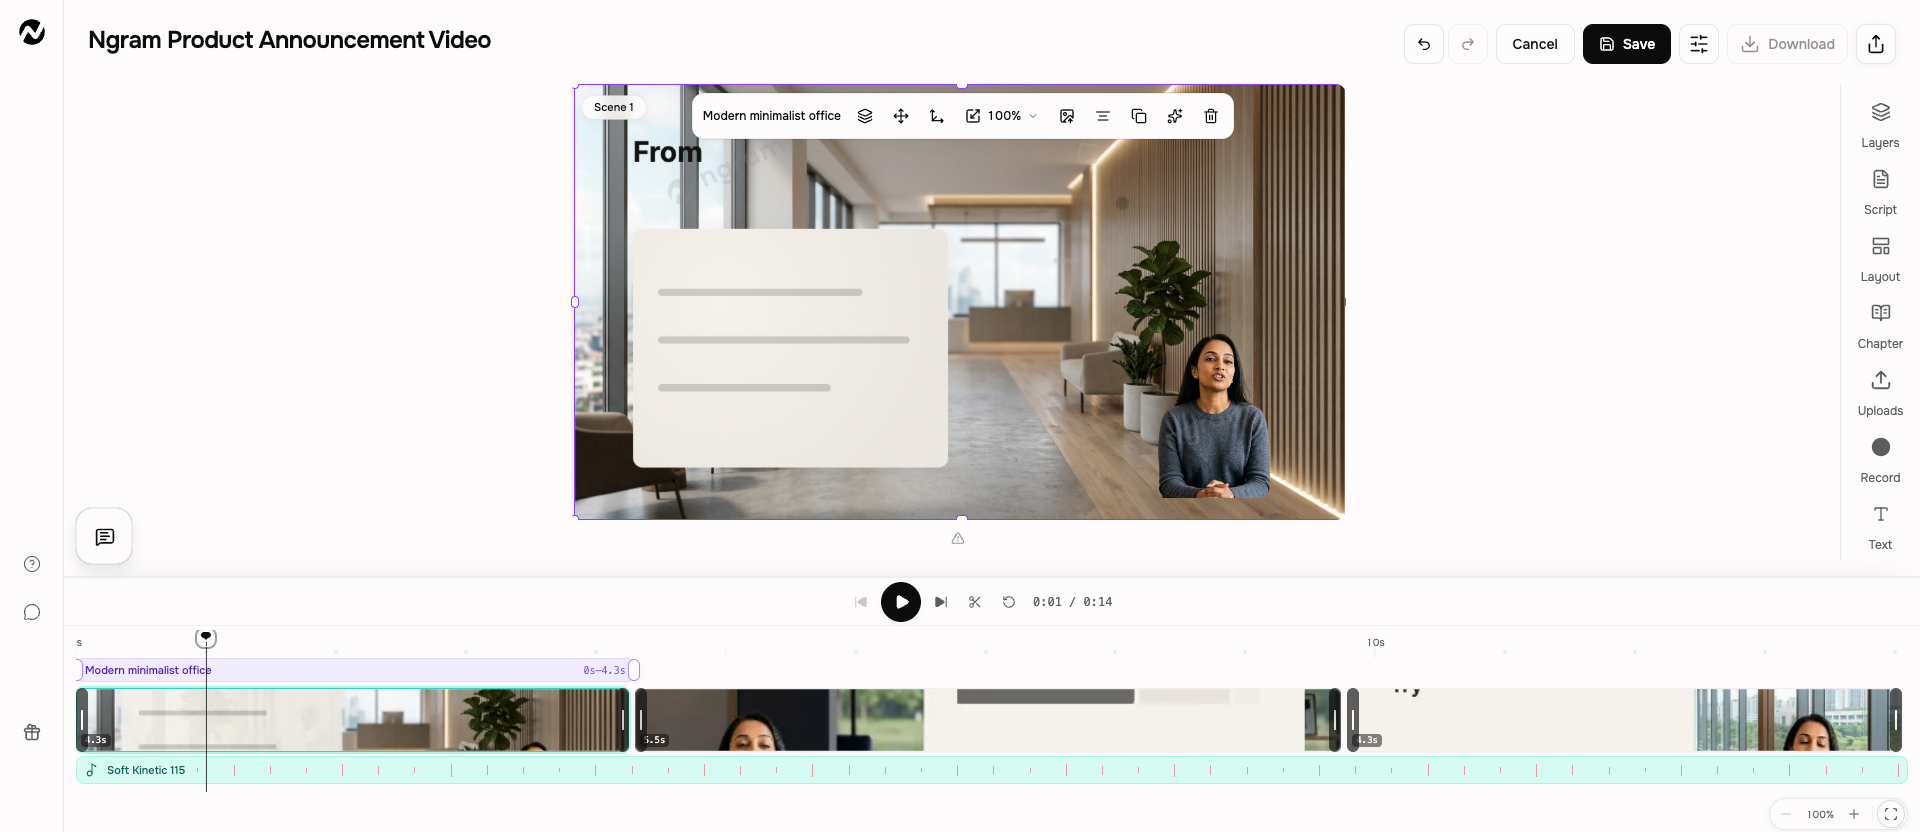
- Select the scene in the timeline. Drag its left or right trim handle inward to remove time from the start or end without deleting the rest of the scene.
- To divide the scene, move the playhead to the intended frame and select Split at playhead. The timeline creates two staged parts from the same source.
- Review both sides of the trim or split. Use Reset trim when you want the selected scene's full source range again.
- Select Save to commit the timeline change, or Cancel to discard the staged edit. Finish or cancel a split before using panels that are temporarily read-only for that staged result.
What each editor panel does
Layers
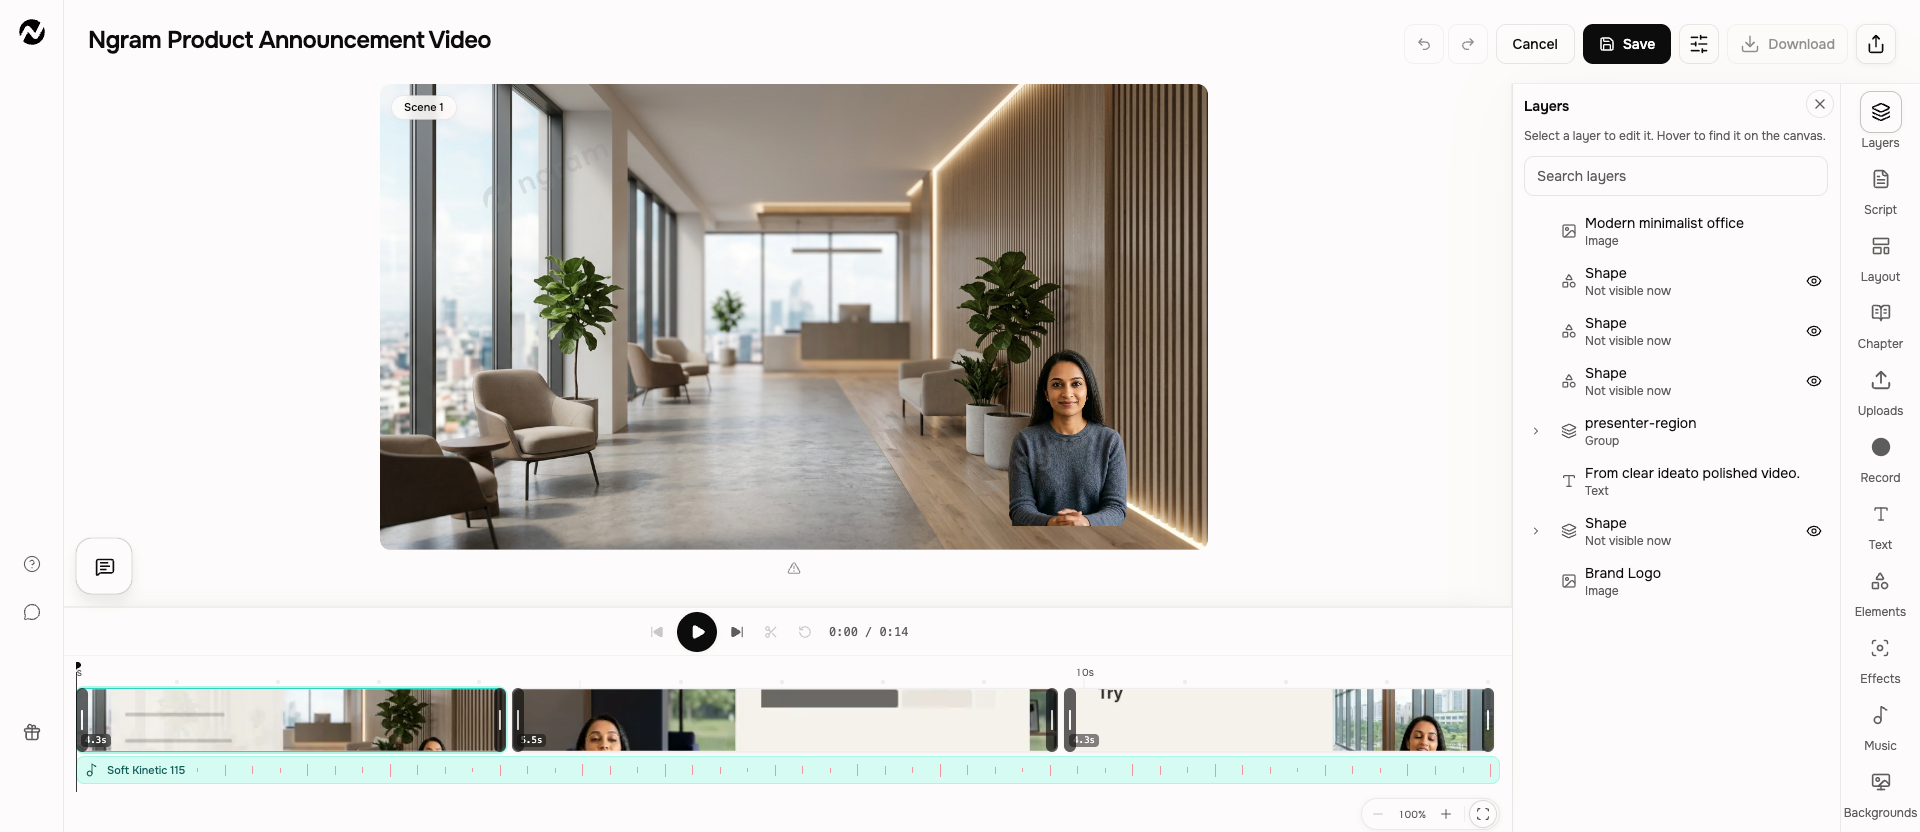
Layers lists the editable text, images, videos, shapes, and groups in the selected scene. Search by the visible layer name, hover a row to find it on the canvas, then select the row to edit it. Expand a group to reach nested items. When a layer is not visible at the current playhead time, use its preview control to show it temporarily without changing the saved timing.
Script
Script shows the narration for every generated scene. Edit the words for the affected scene and select Apply changes; this re-voices that scene while keeping its visuals in sync. If the new wording changes the scene length too much, use Regenerate scene. Some voices require Regenerate narration for every scene to remain consistent. A blank video has no script until narration is added. Script changes must be applied inside this panel; the editor's main Save button is not a substitute.
Uploads
Uploads contains images, logos, and videos already added in this project or through chat. Select Upload files to add an image or video. Select an asset card to add it to the current scene, or drag it onto the canvas.
Replace a scene image or video with uploaded media
- Turn on Edit, choose the intended scene in the timeline, and select its current image or video layer on the canvas.
- Open Uploads. Select Upload files to add a new image or video, or choose an asset already in the project.
- Select the asset card or drag it onto the canvas, then move and resize the new layer.
- If the old visual remains, select that old layer and use the trash control. Confirm the intended scene—not a neighboring scene—now shows the replacement.
- Replay the scene, select Save, and wait for the Changes saved message before exporting or sharing.
Record
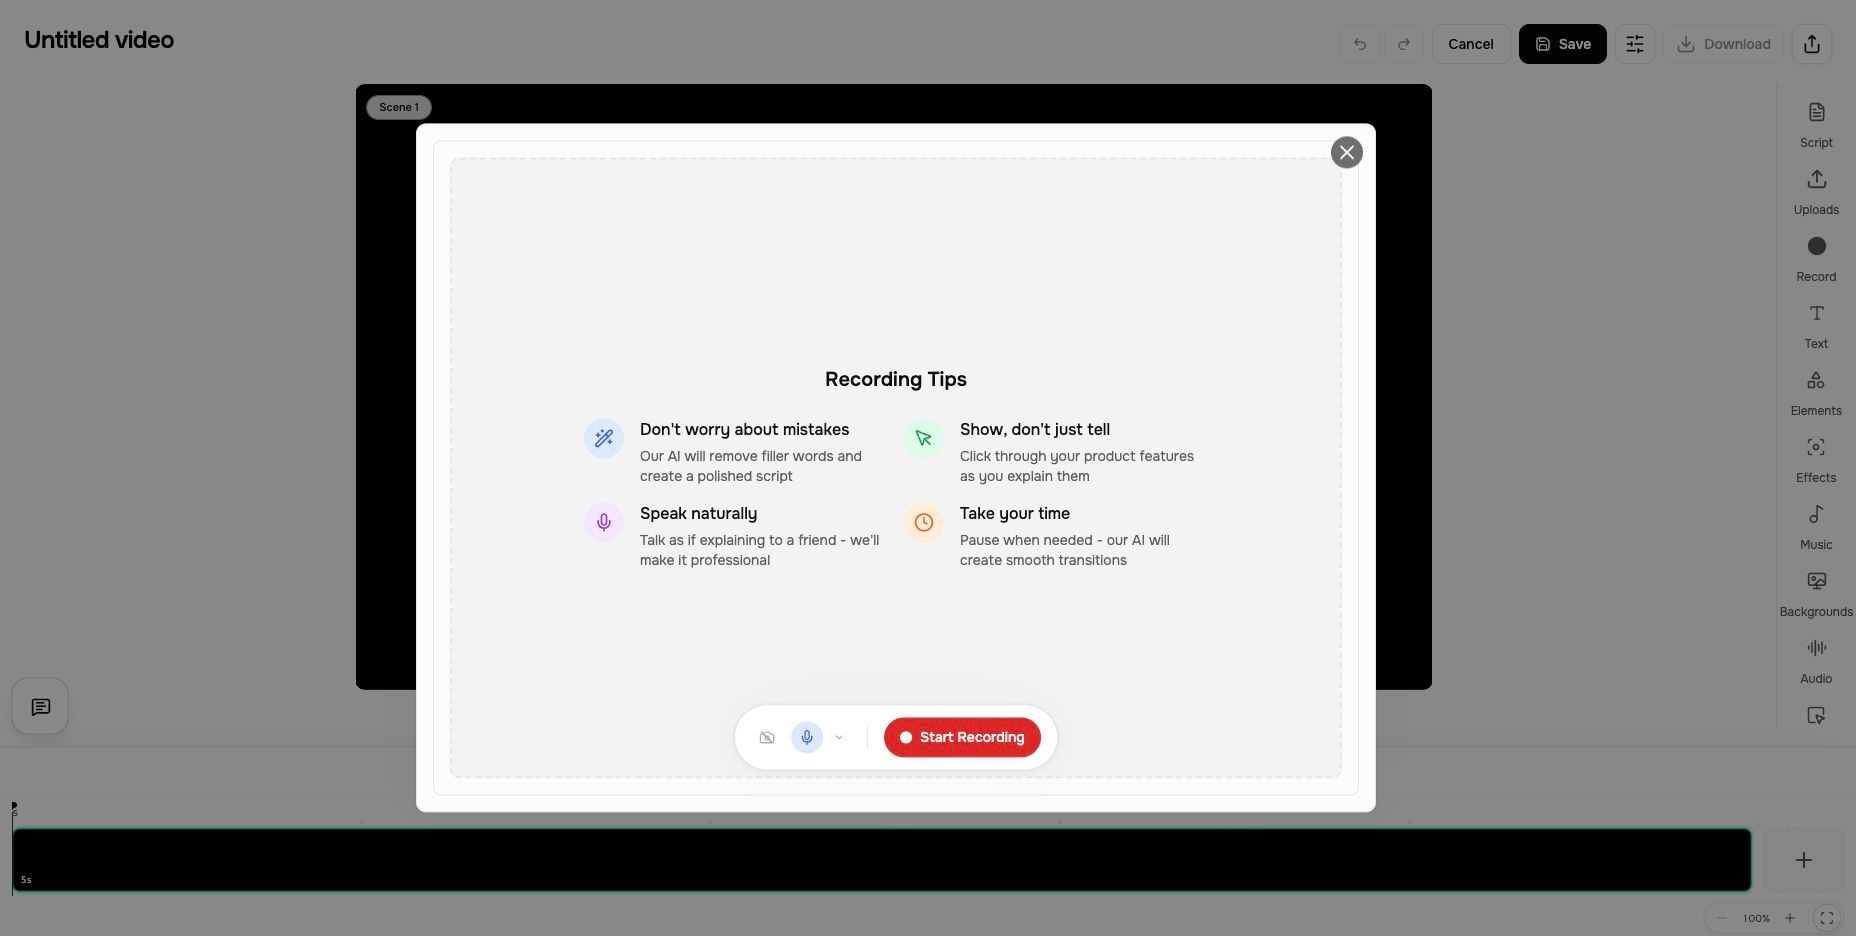
Record opens the screen recorder. Select Start Recording, choose the screen, window, or browser tab to share, finish the recording, review it, and add it as the scene's source video. Record naturally: pauses and mistakes can be handled after capture.
Text
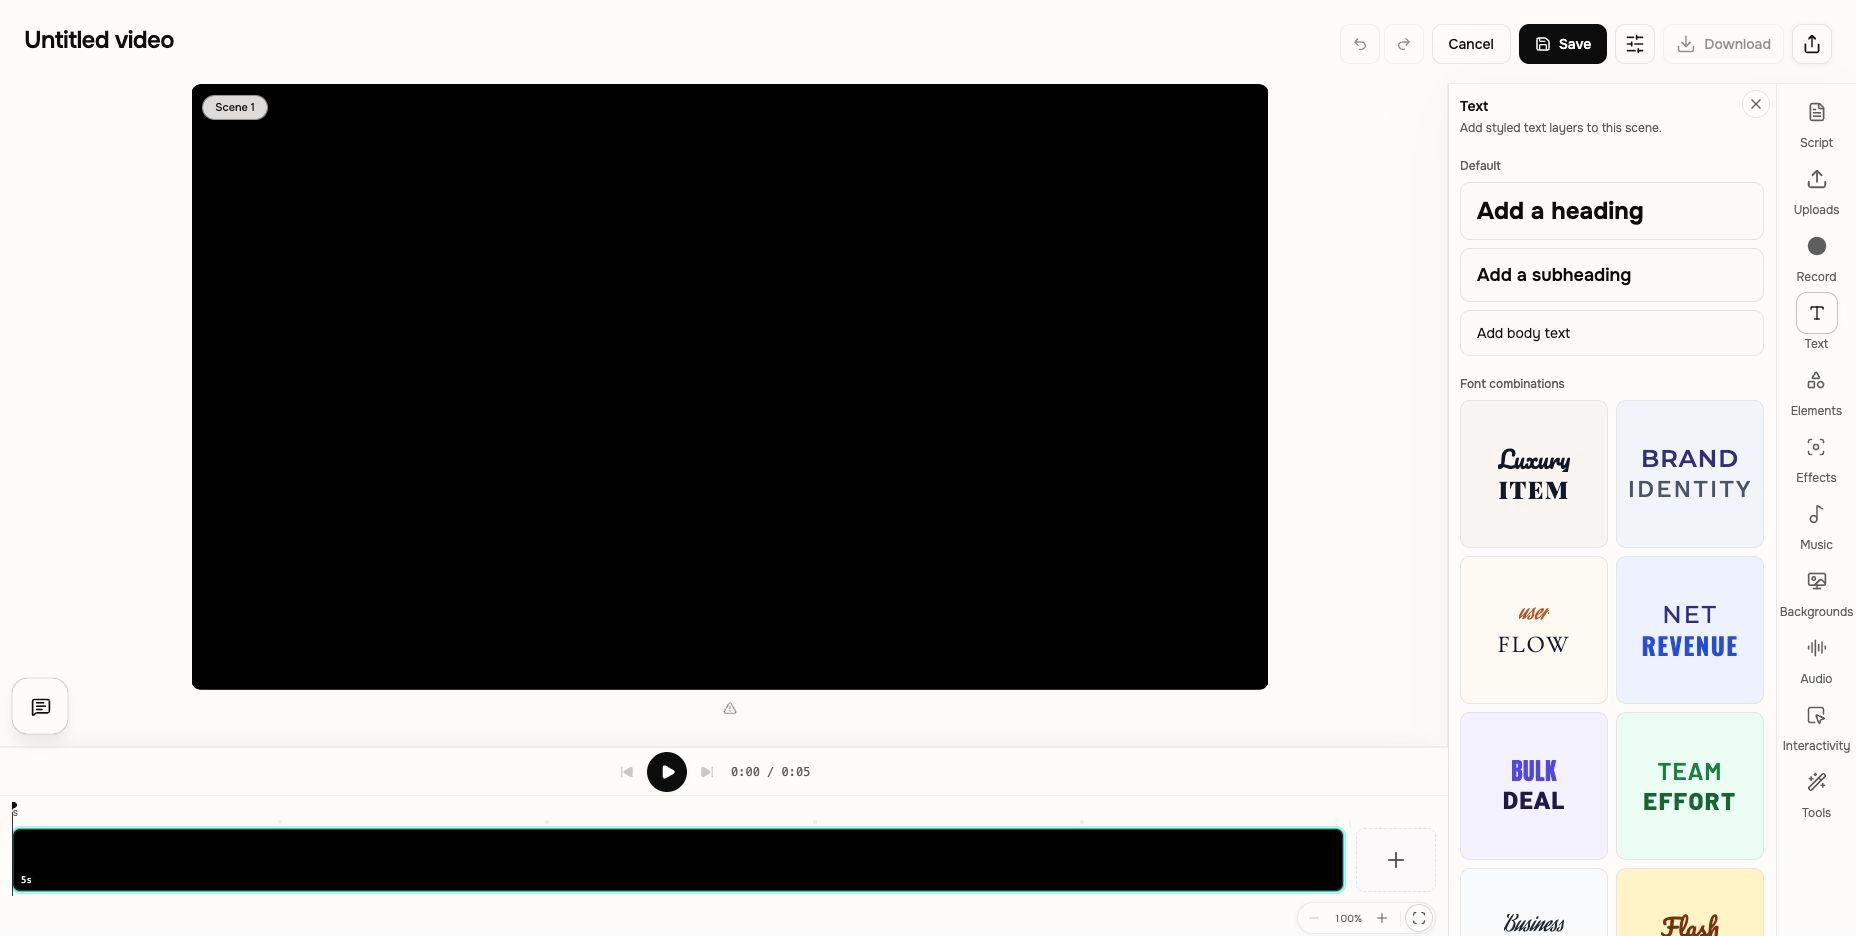
Text adds a heading, subheading, body-text layer, or a coordinated font combination. Select a preset, then double-click the inserted text on the canvas to replace its words. Use the layer controls to position and style it.
Elements
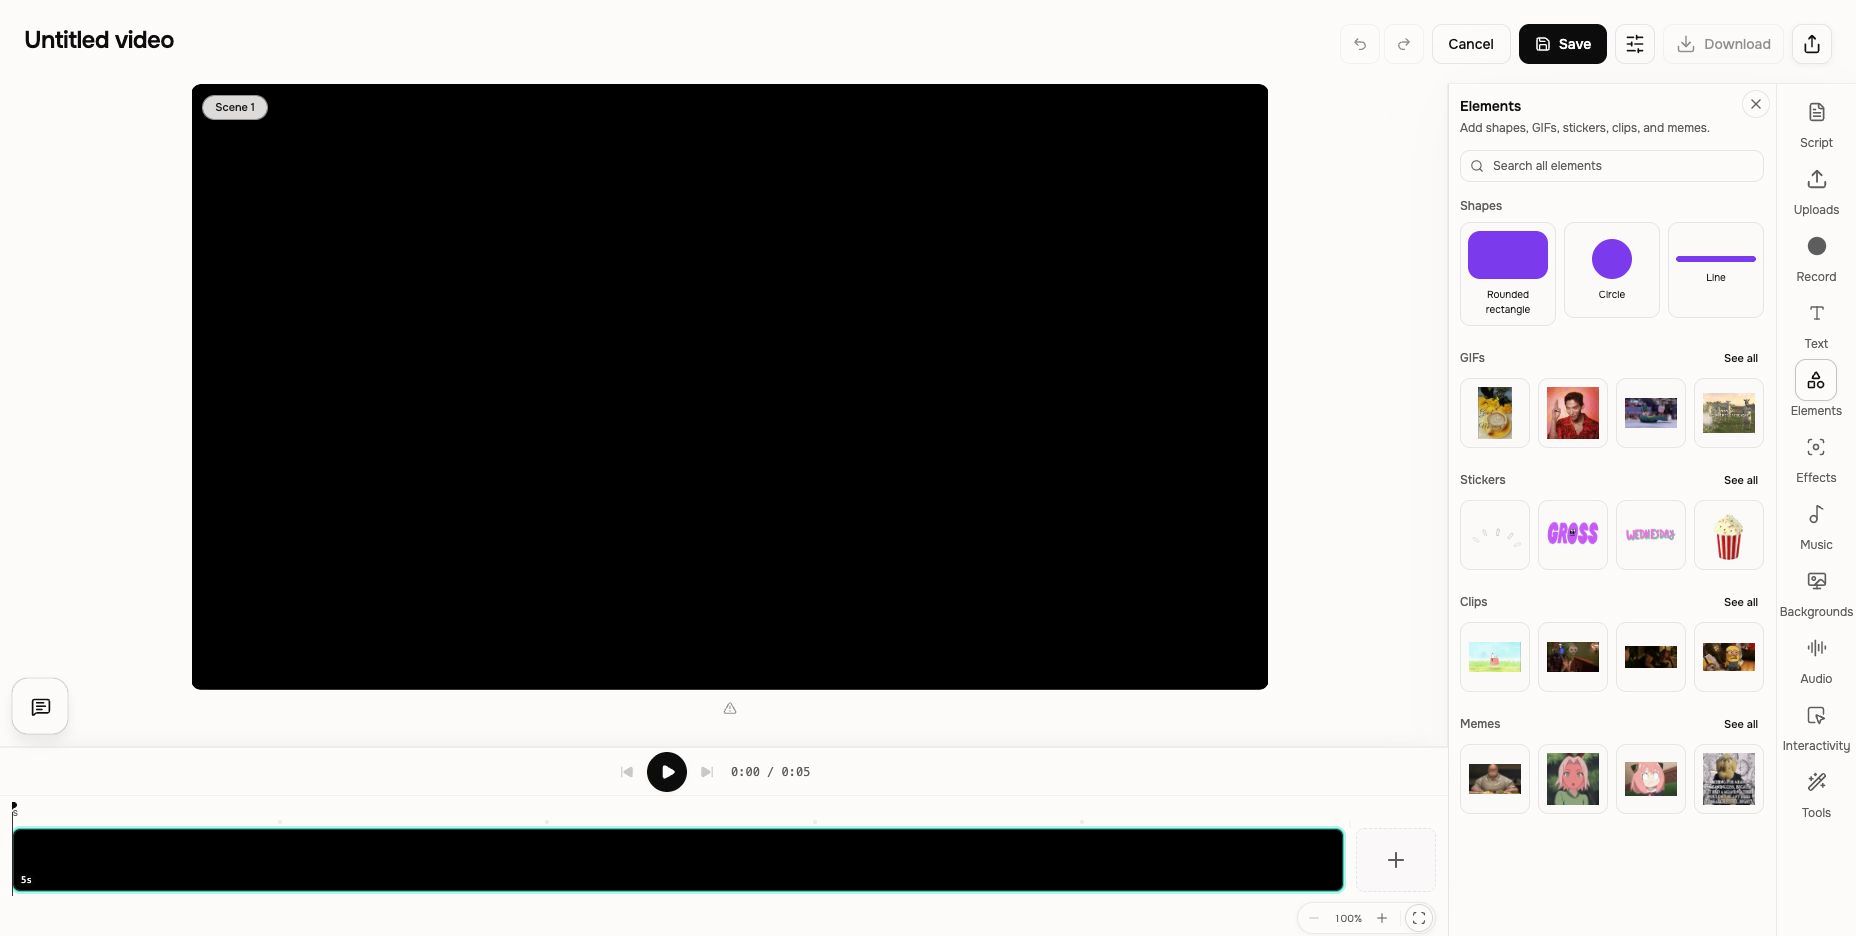
Elements adds a rounded rectangle, circle, line, graphic, illustration, 3D asset, Lottie animation, GIF, sticker, stock clip, or meme. Search the entire library or select See all beside a category. After insertion, adjust the element on the canvas and use its timeline item when one is available.
Effects
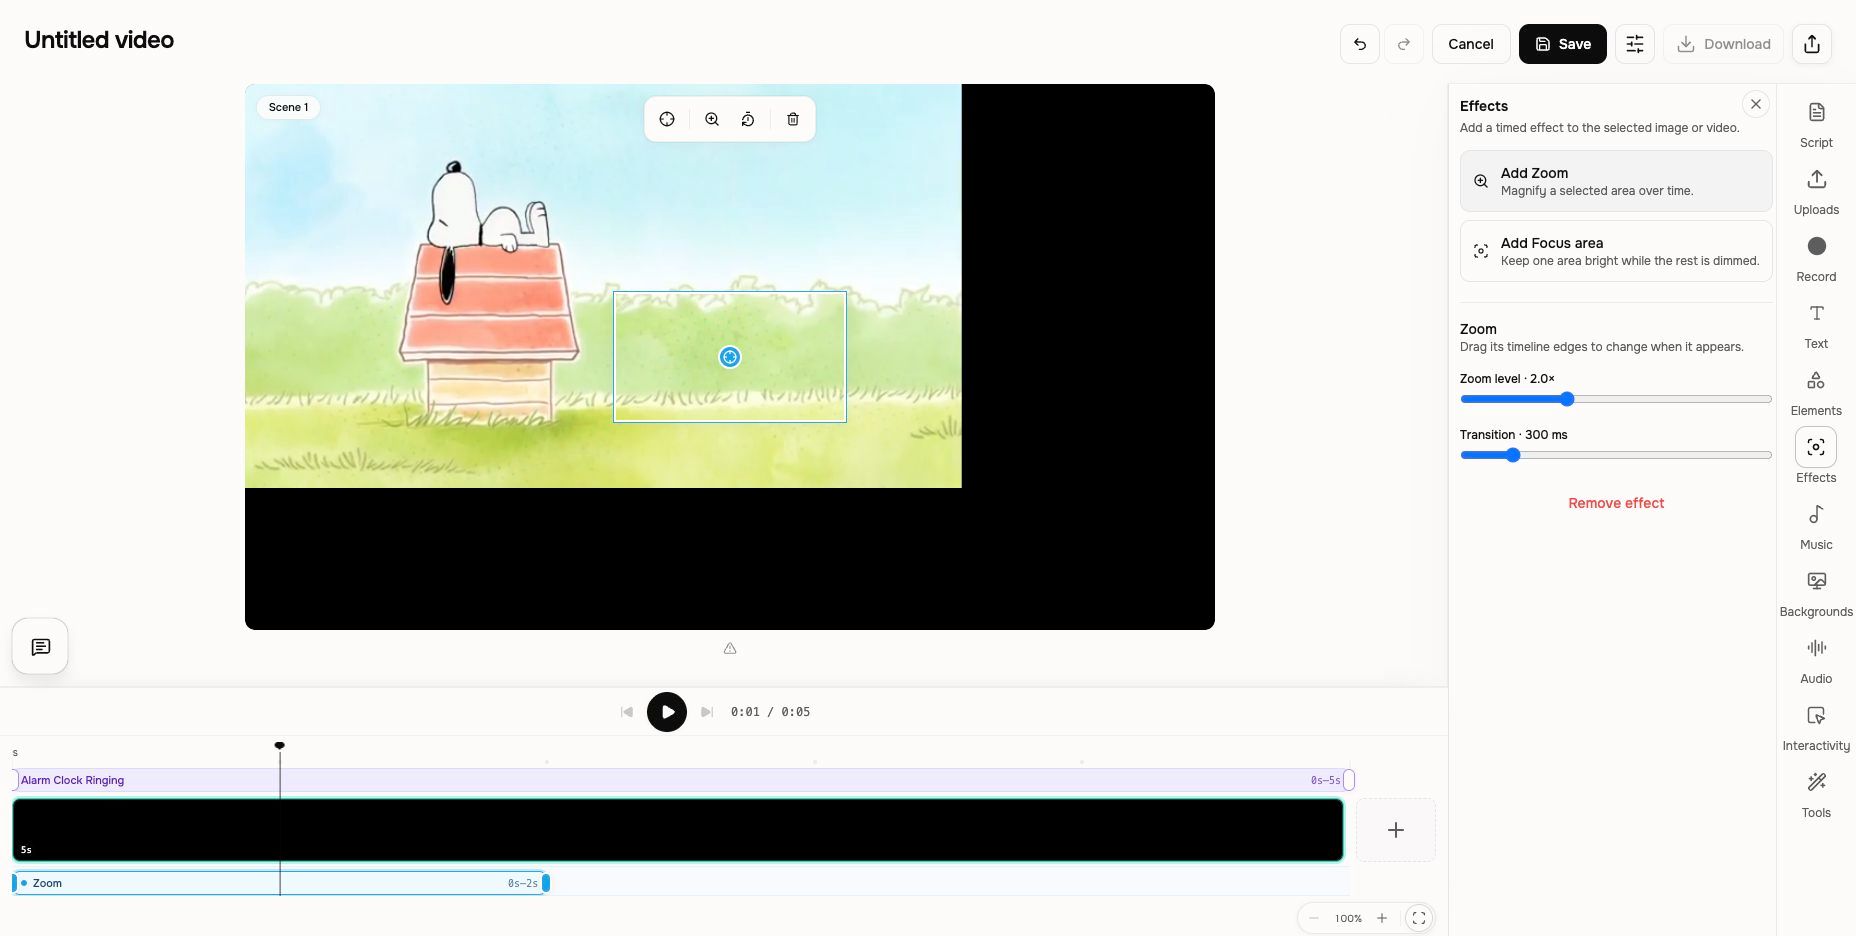
- Select an image or video on the canvas, then open Effects.
- Choose Add Zoom to magnify a selected area, or Add Focus area to keep one area bright while dimming the rest.
- Position the target on the canvas. For Zoom, set its level and transition. For Focus area, choose the shape, darkness, and edge softness.
- Drag the effect item's left or right timeline edge to change when it starts and ends, then replay the scene.
Music
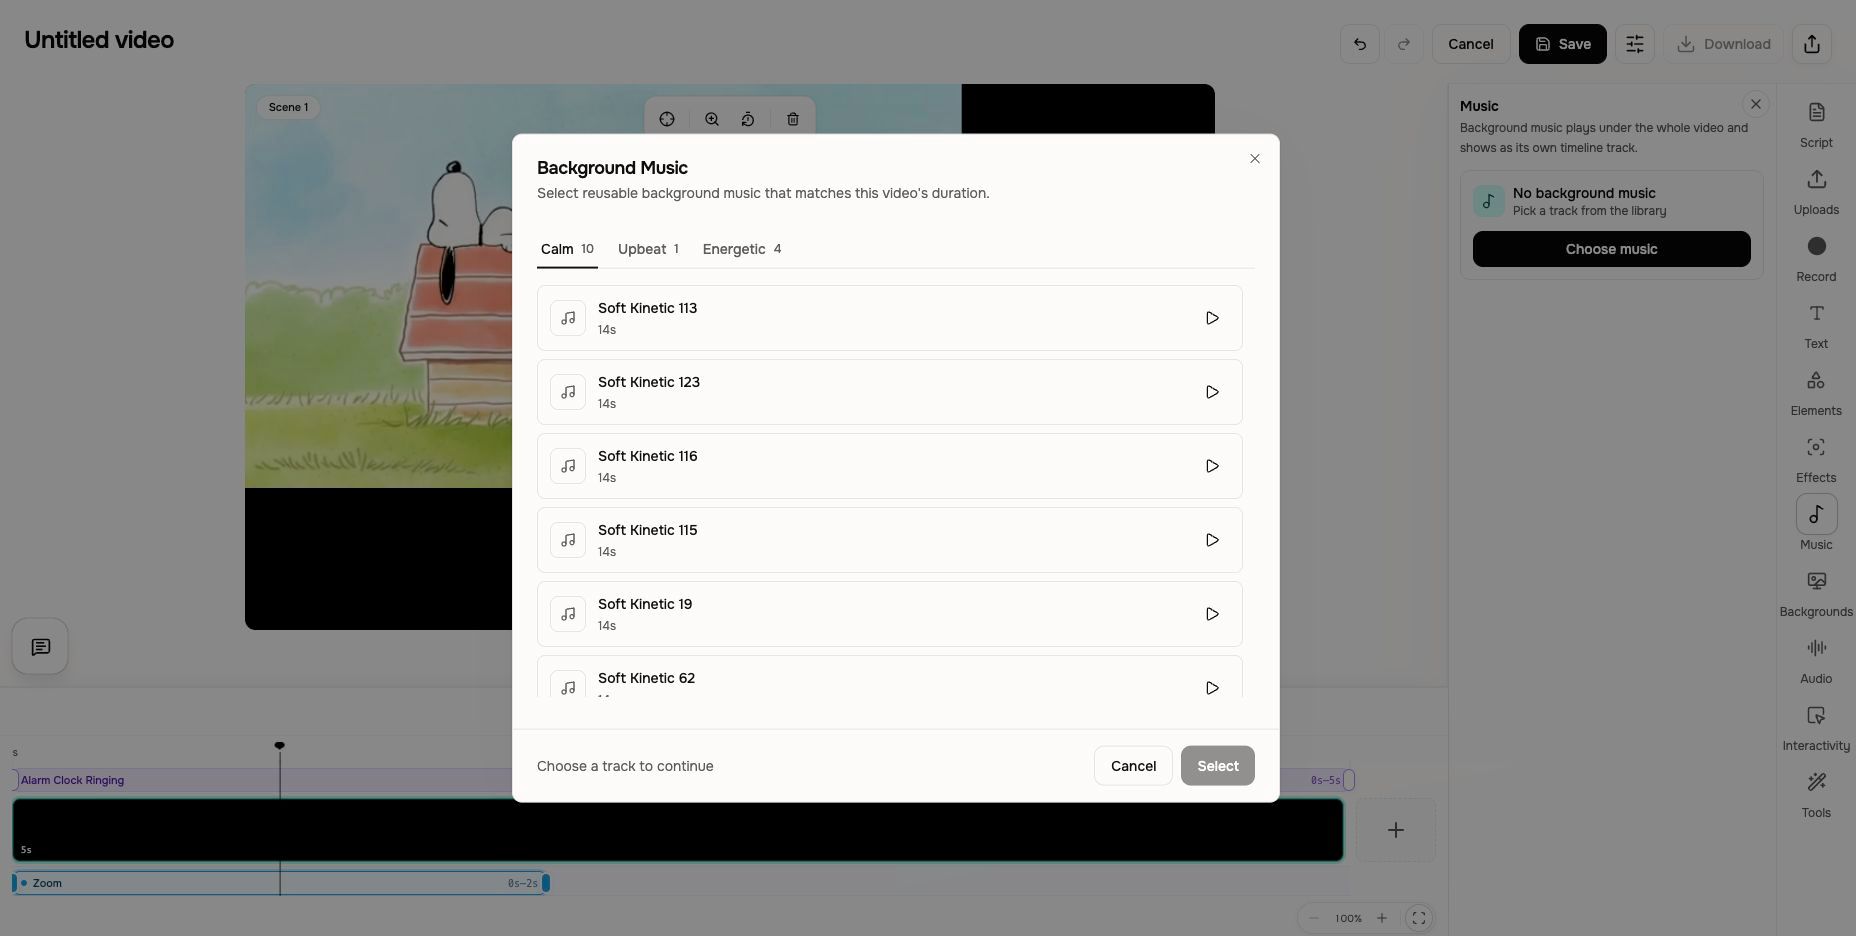
Music controls one background track for the whole video. Select Choose music, preview a track from the available moods, select the track, and confirm with Select. The music appears on its own timeline track and is matched to the video duration. Reopen Music to change the track or adjust its volume, then use the editor's main Save button.
Backgrounds
Backgrounds frames the current scene with no background, a preset color, a library wallpaper, or a compatible uploaded image or video. Select the option and review the canvas before saving. Uploaded backgrounds appear only after media has been added to the project.
Audio
Audio lists existing sound effects for the current scene. Select one to expose its timing controls above the canvas. If the scene has no sound effect, this panel is empty. Voiceover and whole-video background music remain in Edit video and Music; Audio is not a second music library.
Templates and Layout
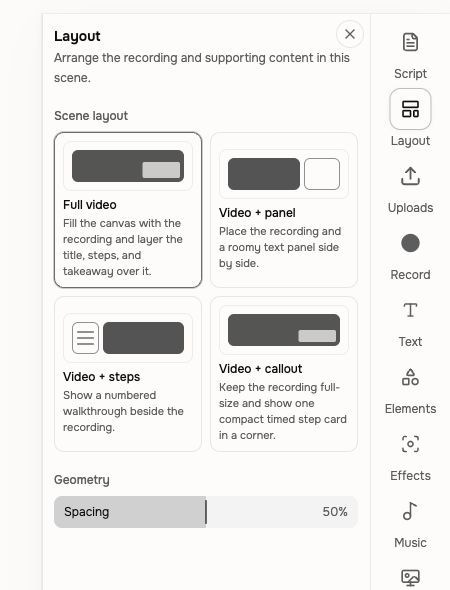
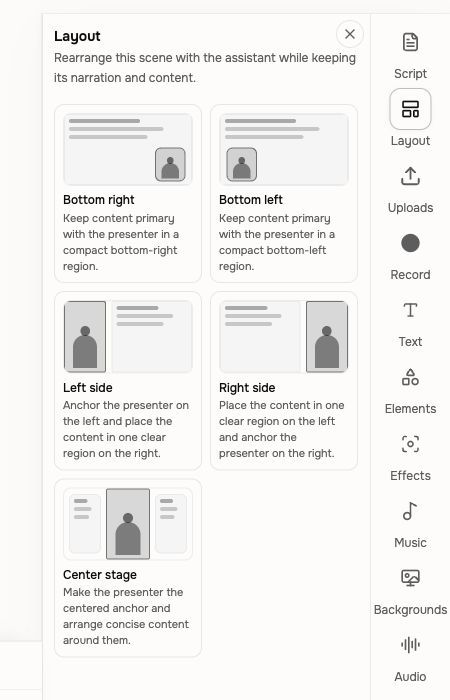
Templates appears for compatible intro or outro slides. It switches the slide layout while keeping compatible text and brand fields; preview a template, then use the panel's Save or Cancel control. Layout appears for supported Avatar and Screencast scenes. The choices depend on the scene type and aspect ratio.
For a Screencast, choose Full video, Video + panel, Video + steps, or Video + callout, then adjust the controls offered by that layout. For an Avatar, choose a presenter placement such as Bottom right, Left side, or Center stage. Avatar layout regeneration can use credits; review the displayed cost, replay the scene, and save only when the arrangement is right.
Interactivity
Interactivity adds a quiz that pauses playback or an action that collects a response or sends viewers to a destination. Availability depends on your plan. Interactive elements have their own configuration, testing, publishing, and analytics workflow; use the dedicated guide before sharing the video.
Tools
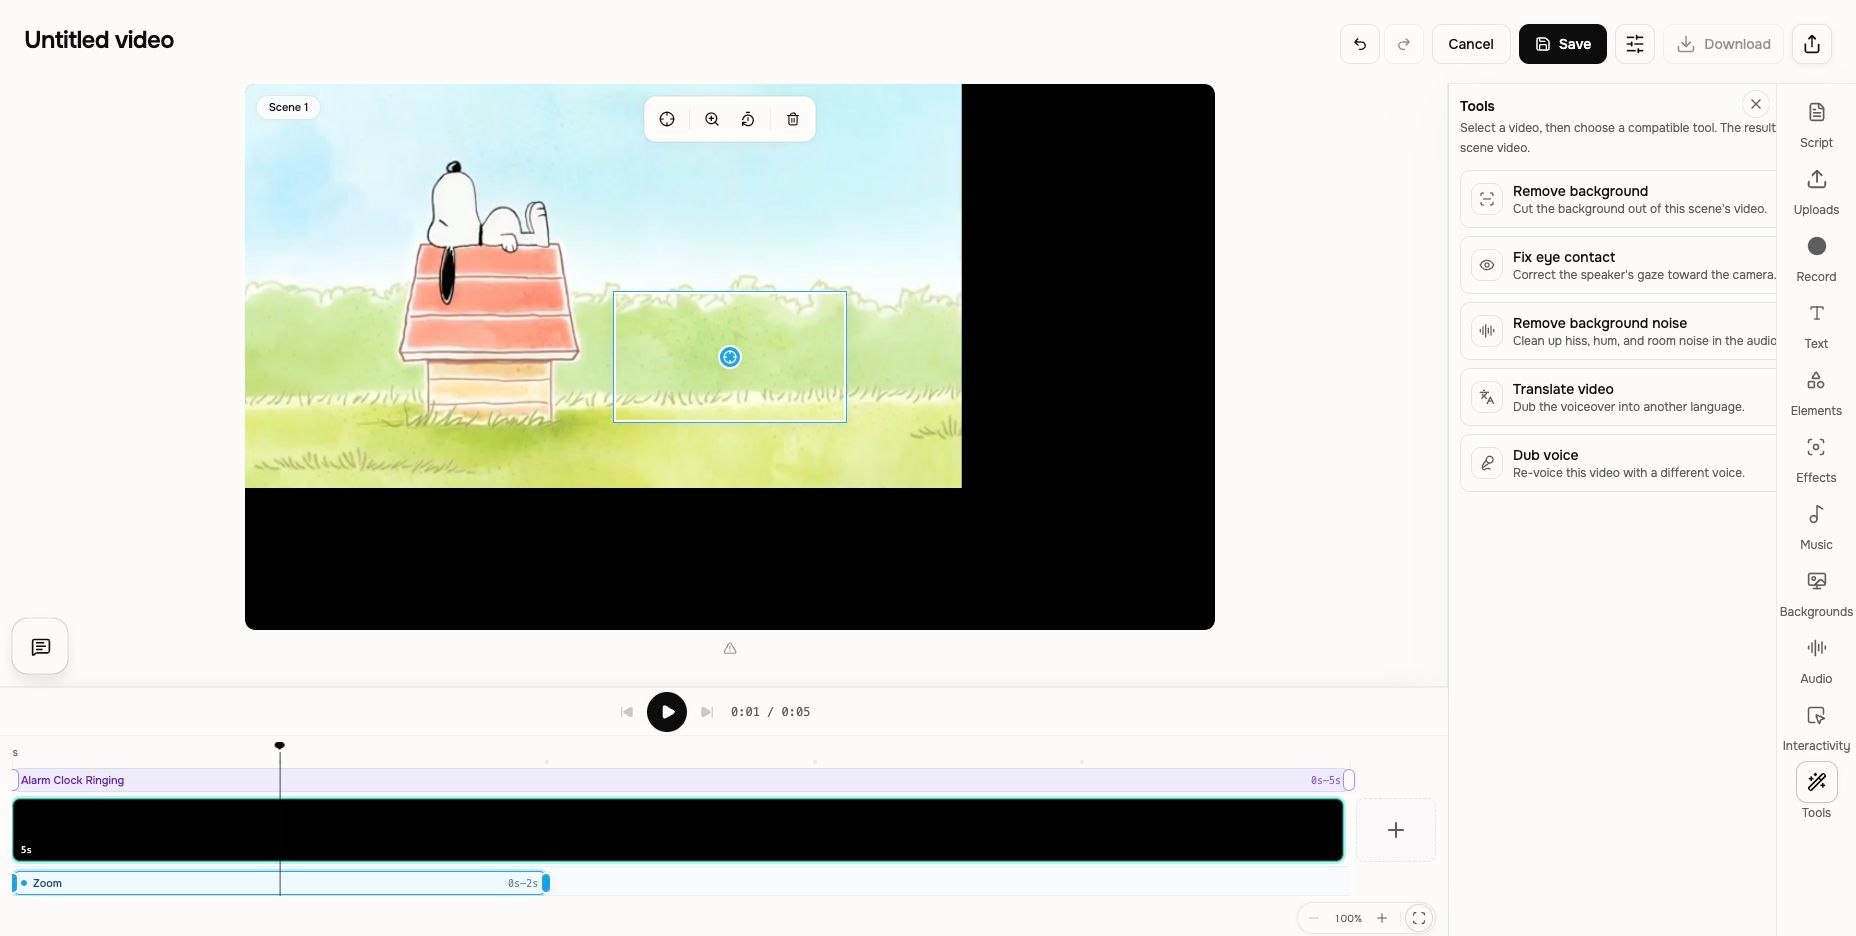
Tools runs a focused AI edit on compatible recorded or uploaded video: Remove background, Fix eye contact, Remove background noise, Translate video, or Dub voice. Select the scene video first. A disabled Tool includes a Why unavailable control that explains what is missing; for example, generated clips are not eligible for Tools that require recorded or uploaded footage, and Translate video or Dub voice requires a single-video project.
Review any displayed credit cost before running a Tool. Its result replaces the selected scene video, and a finished Tool result is kept even if you later close the editor without saving other canvas changes. Use Revert to previous video if the available result is not right.
Add your own intro or outro
In the storyboard, select Add scene and choose Intro / Outro. Pick Intro or Outro, then choose Upload image or video to use your own file, or select a branded Slide template. Review the preview and select Add bookend or Add Slide. An uploaded file must finish processing and be available in your media library before you add it. If the media does not appear, keep the current project and check the upload rather than starting a second video.
Use the Edit video quick controls
Select Edit video above the preview to turn captions, background music, voiceover, or sound effects on or off when those layers exist, or to choose background music. A disabled switch means the project does not currently have a compatible layer. Use Music in the editing rail when you need a precise background-music volume adjustment.
Save and review your changes
- Replay the affected scene and the transition into the next scene. For timed changes, play through both edges of the timeline item.
- Select Save in the top bar and wait for the editor to close. A Changes saved message confirms the staged edit session was committed.
- Replay the saved video before downloading or sharing it. Download can remain unavailable while saved changes are still syncing.
Expected result
After the Changes saved message appears, replaying the video shows the new media, text, layout, audio, or timing in the intended scene. Independently created full-editor copies remain separate and do not synchronize with the conversation.
When to return to chat
Return to agentic chat for a new storyline, a broad visual direction, several coordinated scene changes, or a request you can describe more easily than place by hand. Stay in the scene editor for local adjustments whose exact position, wording, style, or timing you want to control yourself.
If something is missing or unavailable
- A panel or control can depend on the selected scene type, selected layer, project contents, plan, ownership, or completion state. Select the scene and the relevant image or video before deciding that a control is missing.
- If you try to switch scenes or leave with staged changes, select Keep editing, then Save. Choosing Discard changes removes the unsaved scene edits.
- If Save reports a conflict, a partial save, or a changed conversation, preserve any unsaved wording and use the one-reopen recovery below. Do not keep retrying Save.
- If an animated image upload is rejected, add a GIF from Elements or upload a still image or video instead.
- On mobile, continue the revision through agentic chat or reopen the project on desktop for manual canvas editing.
If the editor will not load, controls are missing, or a change will not save
- Preserve unsaved wording outside the page, keep the project URL, and note the selected scene, missing control, or change that disappeared.
- Confirm the conversation has a finished video, Edit is turned on, and the relevant scene or canvas element is selected. Some controls appear only for a compatible layer or scene type.
- Reopen the exact project once from Projects. Re-select the scene and make only the smallest lost change again, then select Save once. Review a displayed credit estimate before any regeneration.
- Replay the scene and verify the change in the current session. If the editor still does not load, the control remains missing, or the change disappears again after the one reopen above, stop and contact Support.
Already reopened once? Stop and contact Support
Do not keep refreshing, re-uploading, or regenerating if the same editor or save problem returns. Send Support the project URL, approximate time, affected scene or timestamp, visible error or missing control, browser, file type when an upload is involved, whether you retried once, and whether Usage shows a credit change. Keep the project and source file while it is investigated.
Inline editing FAQ
How do I replace a scene image with my uploaded photo?
Turn on Edit, select the intended scene, and open Uploads. Upload or choose the photo, add it to the canvas, then remove the old selected layer if it remains. Confirm the correct scene changed, select Save, and replay it before export.
Why is the editor blank and why are controls missing?
Controls depend on the completion state, selected scene, layer, and content type. Confirm the video is finished, Edit is on, and the compatible scene or canvas element is selected. Reopen the same project once; contact Support if the control should apply but remains unavailable.
Why did my saved edit disappear?
First confirm you reopened the same conversation rather than a fork or editor copy. Preserve any unsaved text, repeat only the smallest change once, select Save, and verify it in the current session. If it disappears again, stop and contact Support.
Can I edit narration without changing the visuals?
Yes. Select Edit → Script, change the narration for the affected scene, and select Apply changes. ngram re-voices that scene while retaining its visuals; a large timing change may offer Regenerate scene instead.
Does Open in editor change my conversation project?
No. Open in editor creates an independent project. Changes in that copy and later changes in the original conversation do not synchronize.
I already reloaded the same editor and it is still blank. What should I do?
Stop reopening or repeating edits and contact Support. Include the project URL, approximate time, browser, missing controls or visible error, whether unsaved work may be affected, and whether Usage shows a credit change. Keep the project while it is investigated.
Keep going
- Revise a generated video — Choose between chat revisions, frame-specific requests, direct scene editing, and a full-editor copy.
- Use the full video editor — Understand the separate editor-copy workflow and how it differs from editing inside a conversation.
- Work with the timeline — Navigate scenes and tracks, adjust supported timing, and review precise ranges.
- Adjust music, voiceover, and captions — Control the video's narration, captions, music, and sound layers.
- Add quizzes and action buttons — Create, publish, test, and analyze interactive elements on eligible videos.
- Edit media with focused AI Tools — Run, verify, and recover focused video and audio processing Tools.
Polish your video in context
Open a finished agentic conversation, select Edit, and make the smallest change that gets the result right.
Was this helpful?
Still need help? Ask the team